To use Luxride, please make sure you are running
WordPress 6 or
higher, PHP 7.4 or higher, and MySQL 5.6 or higher.
We have tested it with Mac, Windows. Besides, please check the recommended server
configuration
for proper theme functioning: Our Recommended Version above wordpress 5.5 and php 7.4.
Minimum server configuration
PHP version - 7.4 and higher
MySQL version - 5.6 or higher
memory_limit – 512M
max_execution_time – 1000
max_input_time – 300
upload_max_filesize – 216M
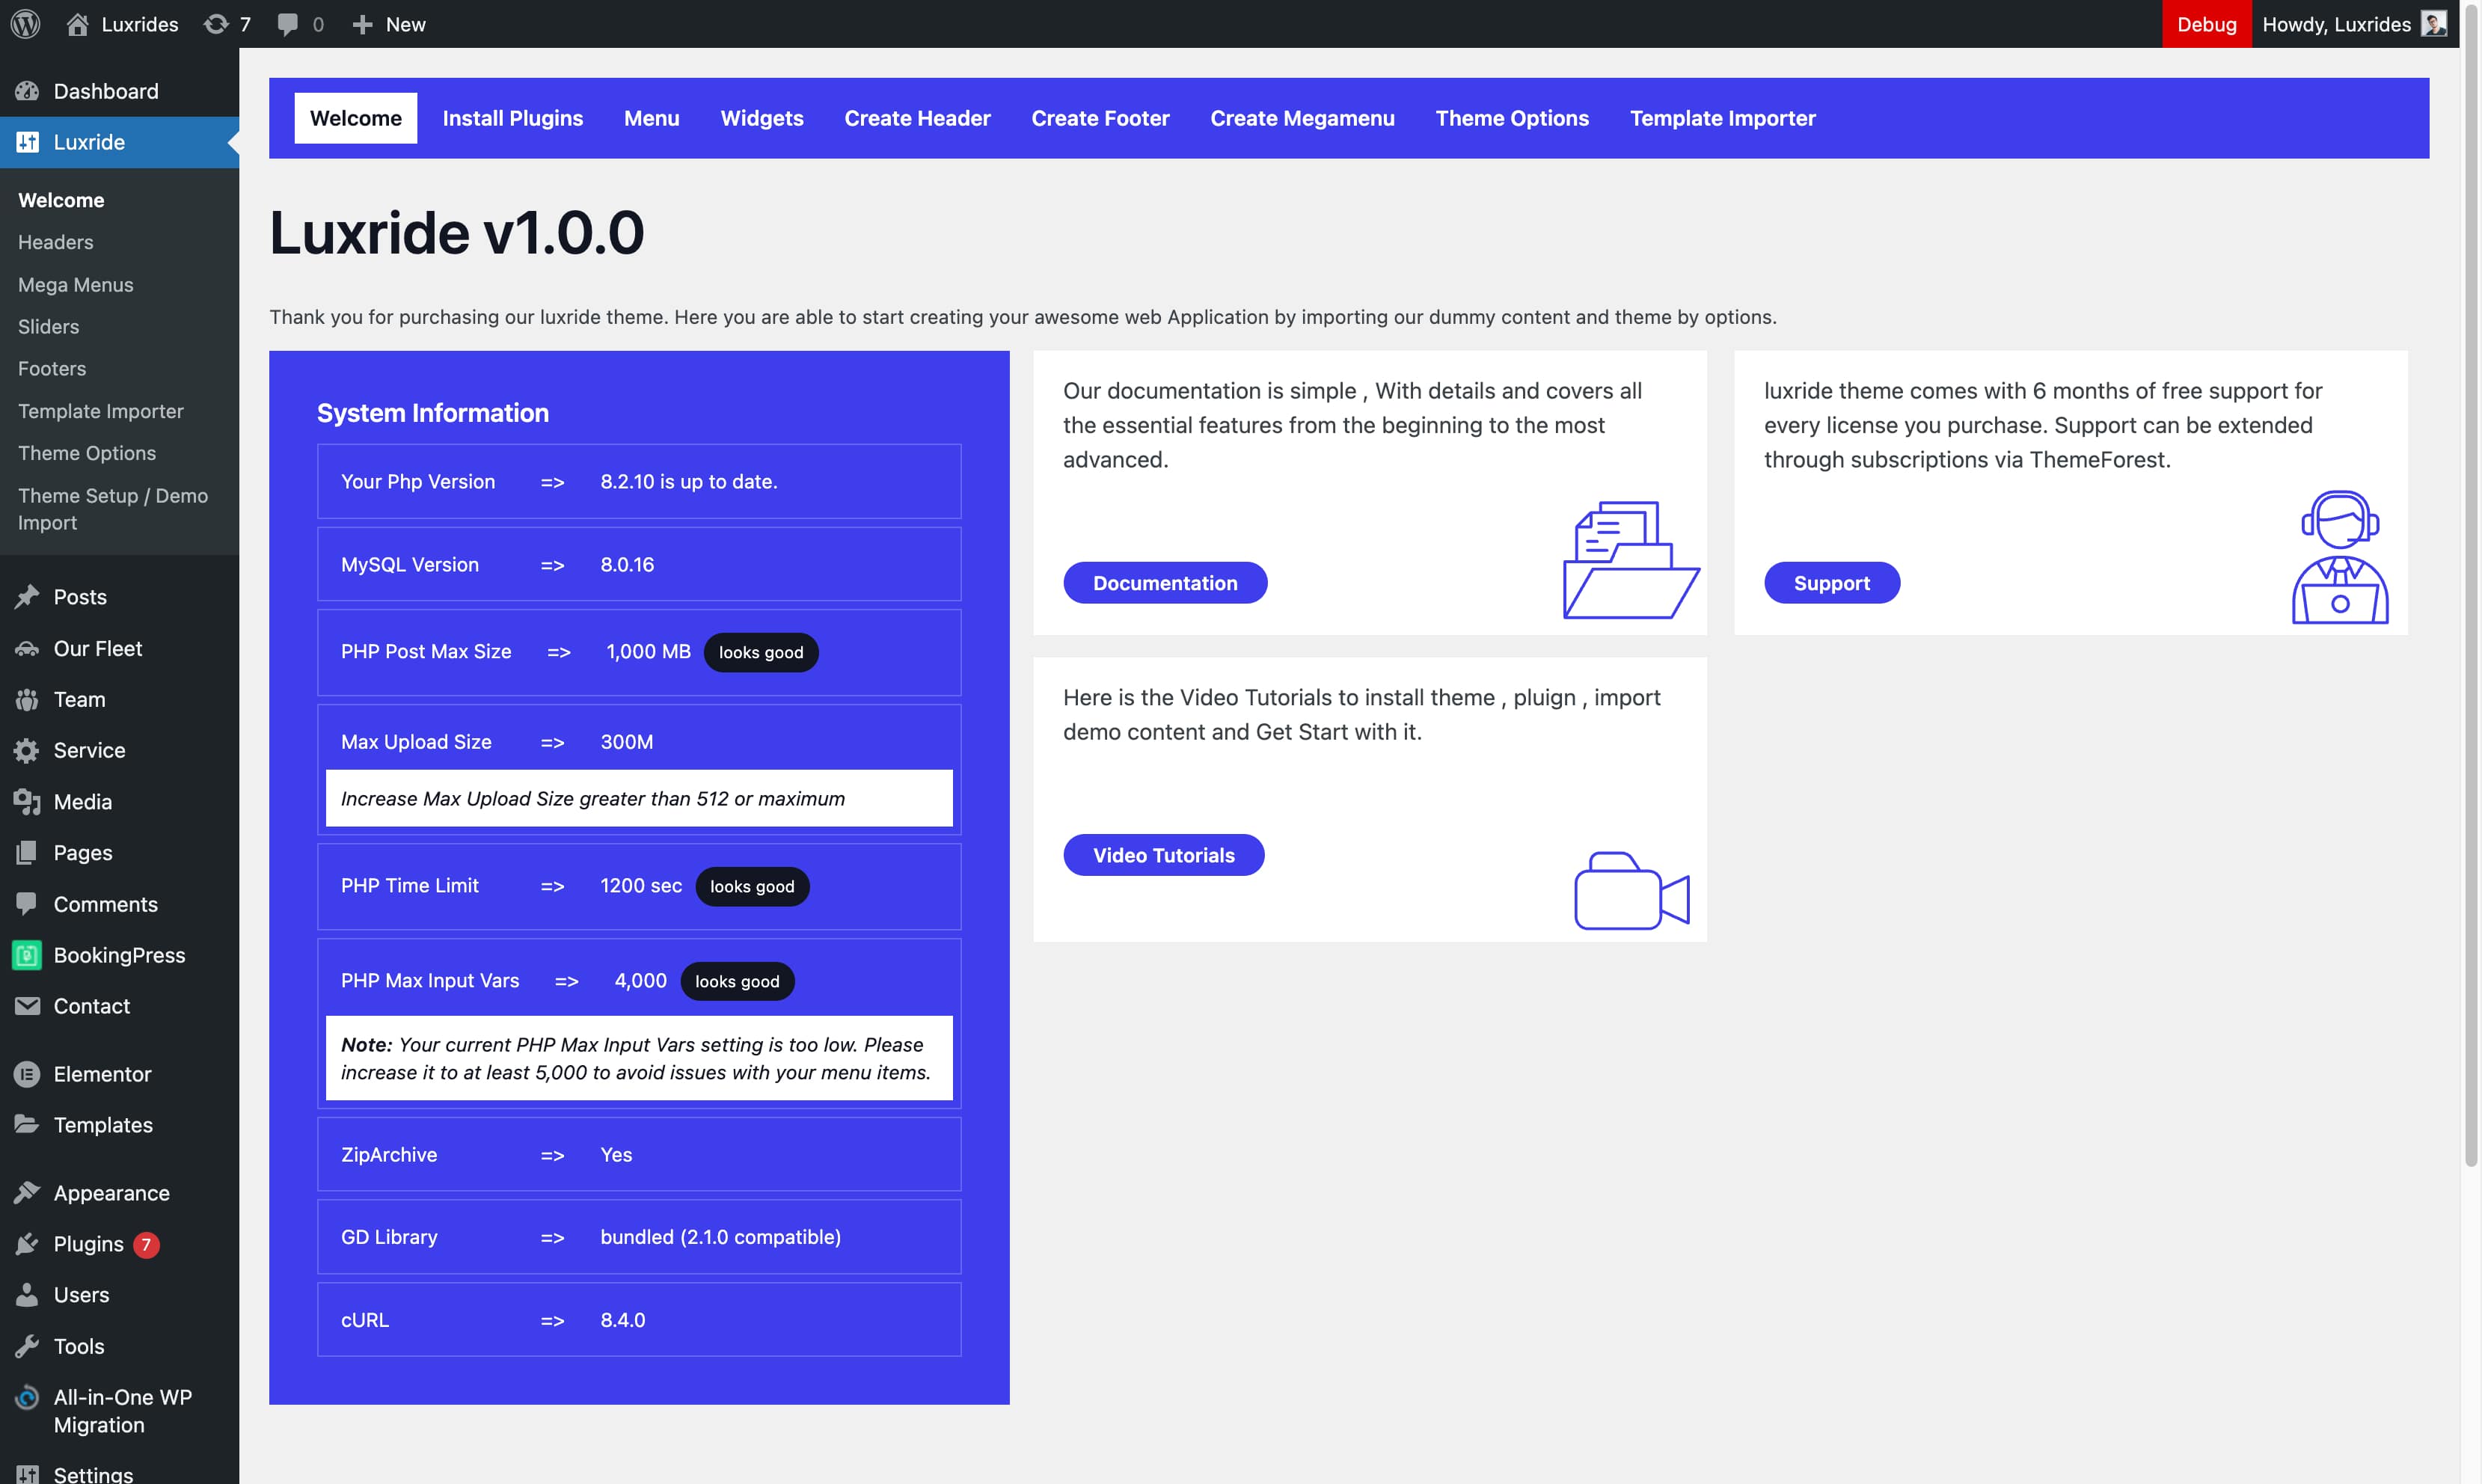
Or Check your server Configuration on your Wordpress Dashboard -==> Go to Luxride
-==> About Luxride
# Files Included in Luxride Package
Files Included in Packages
Luxride.zip , Luxride-child.zip This is the Theme You want To use
to build site.
Documentation : This Folder Contains Docmentation
Link
Demo-content : This Folder contains demo data files
For Impot Dummy Content
Licensing : This folder contains coygen theme
License.
Theme-core-plugin : This folder contains coygen Core
pluign.
Luxride Icons : This folder contains Luxride
icons We used in our theme.
Note : If you are elementor user just deactivate wpbakery( js visual composer )
# Theme , Pluign Installation and Import Demo Content
There are 2 ways to upload the theme. Please fallow the given steps.
Via Dashboard
Navigate to Appearance → Themes in your WordPress admin
dashboard.
Click the Add New button at the top of the page then go for the Theme
Upload
option.
For the file upload, pick Theme Files / Luxride.zip
in the
theme package downloaded from ThemeForest and click Install Now.
Click Activate and it will redirect you to the theme setup wizard. Then execute the steps to install the child theme, install the plugin and import the demo content after finish import click ===> view your Website.
After Activate the theme, setup wizard won't pop up, then go to Luxride ==> Theme Setup / Import Demo, it will take you to theme setup wizard.
Via FTP (Recommended)
Extract the theme package downloaded from ThemeForest Luxride-main-package.zip open the folder.
Open any FTP aplication like Filezilla navigate to the directory of
the
Theme.
For the file upload, pick Theme Files / Luxride.zip
in the
theme package downloaded from ThemeForest.
Navigate to Appearance → Themes in your WordPress admin
dashboard.
Click Activate once the upload has finished and you're ready for
the next
step: Installing the Plugins.
Method 1: To import all the pages form luxride follow the video.
After installing the theme and plugins.
Go to Luxride --> Click on Theme Setup and Demo Import -> Run the Wizard -> At the end, you will find the Import Demo Content tab -> Click on the Import button.
Wait for few minutes to finish import demo content 100%
After successfully importing the demo content it takes to next tab and click view website or return to dashboard
Method 2: To import Selected pages:
After installing the theme and plugins.
Go to Luxride --> Click Template Importer. It will takes to tempalte importer page.
First import the -> Service , Ourfleet , Team , sliders , Media , Widgets and Contact Forms.
Wait for few minutes until finish import. It will take time so please be patience.
After successfully Import the posts and contact form.
Go to Luxride -> click Header -> Create header -> Example Header 1
Go to Luxride -> click Footer -> Create Footer -> Example Footer 1
Go to Pages -> Create Pages -> Example Home , About , Pricing , Team And Contact
After Creating all these then go to luxride --> template importer --> Import Selected Header , Footer and pages Template.
# After Import Enable the responsive breakpoints in elementor ( Must )
Follow below video to enable responsive breakpoints in elementor
# Troubleshoot Options for Elementor
Regenerating CSS: This can easily be fixed by going to WP admin ==> Elementor ==> Tools ==> Regenerate CSS. Then, you can clear the cache (WP cache and browser cache) and refresh the page. Clearing Site Cache: Check if you have any caching plugins on your site or any server level caching enabled. Clear those caches.
On Your Dashboard go to Elementor ==> Tools ==> Regenerate CSS
Troubleshoot if elementor editor is not loading
# Too To Set up the Homepage & Blog ?
If you Imported demo content , the homepage should already be set.
To set a custom page as homepage:
Go to Settings - Reading.
Select a Static Page option.
Select page for front page and blog.
# Too enable maintenance mode (stagin site option) , Site Cookies , Preloader for site and Backtotop ?
Go to Luxride ==> theme option ==> Luxride Maintenance Mode / Cookies Settings ==> Enable Maintance mode
Customers cannot view your site. After complete your work disable that option
Go to Luxride ==> theme option ==> Luxride Maintenance Mode / Cookies Settings ==> Cookies Mode Enable / Disable
Cookies option enable on your site
Go to Luxride ==> theme option ==> Luxride Preloader Settings ==> Preloader Enable / Disable
Preloader Will enable on your site
Go to Luxride ==> theme option ==>
luxride Header / Footer Settings ==> Footer Options
==> Back to Top Enable / Disable
Back to Top Will enable on your site
# To Create the Menu
Defining a Menu
You must define a menu before you can add items to it.
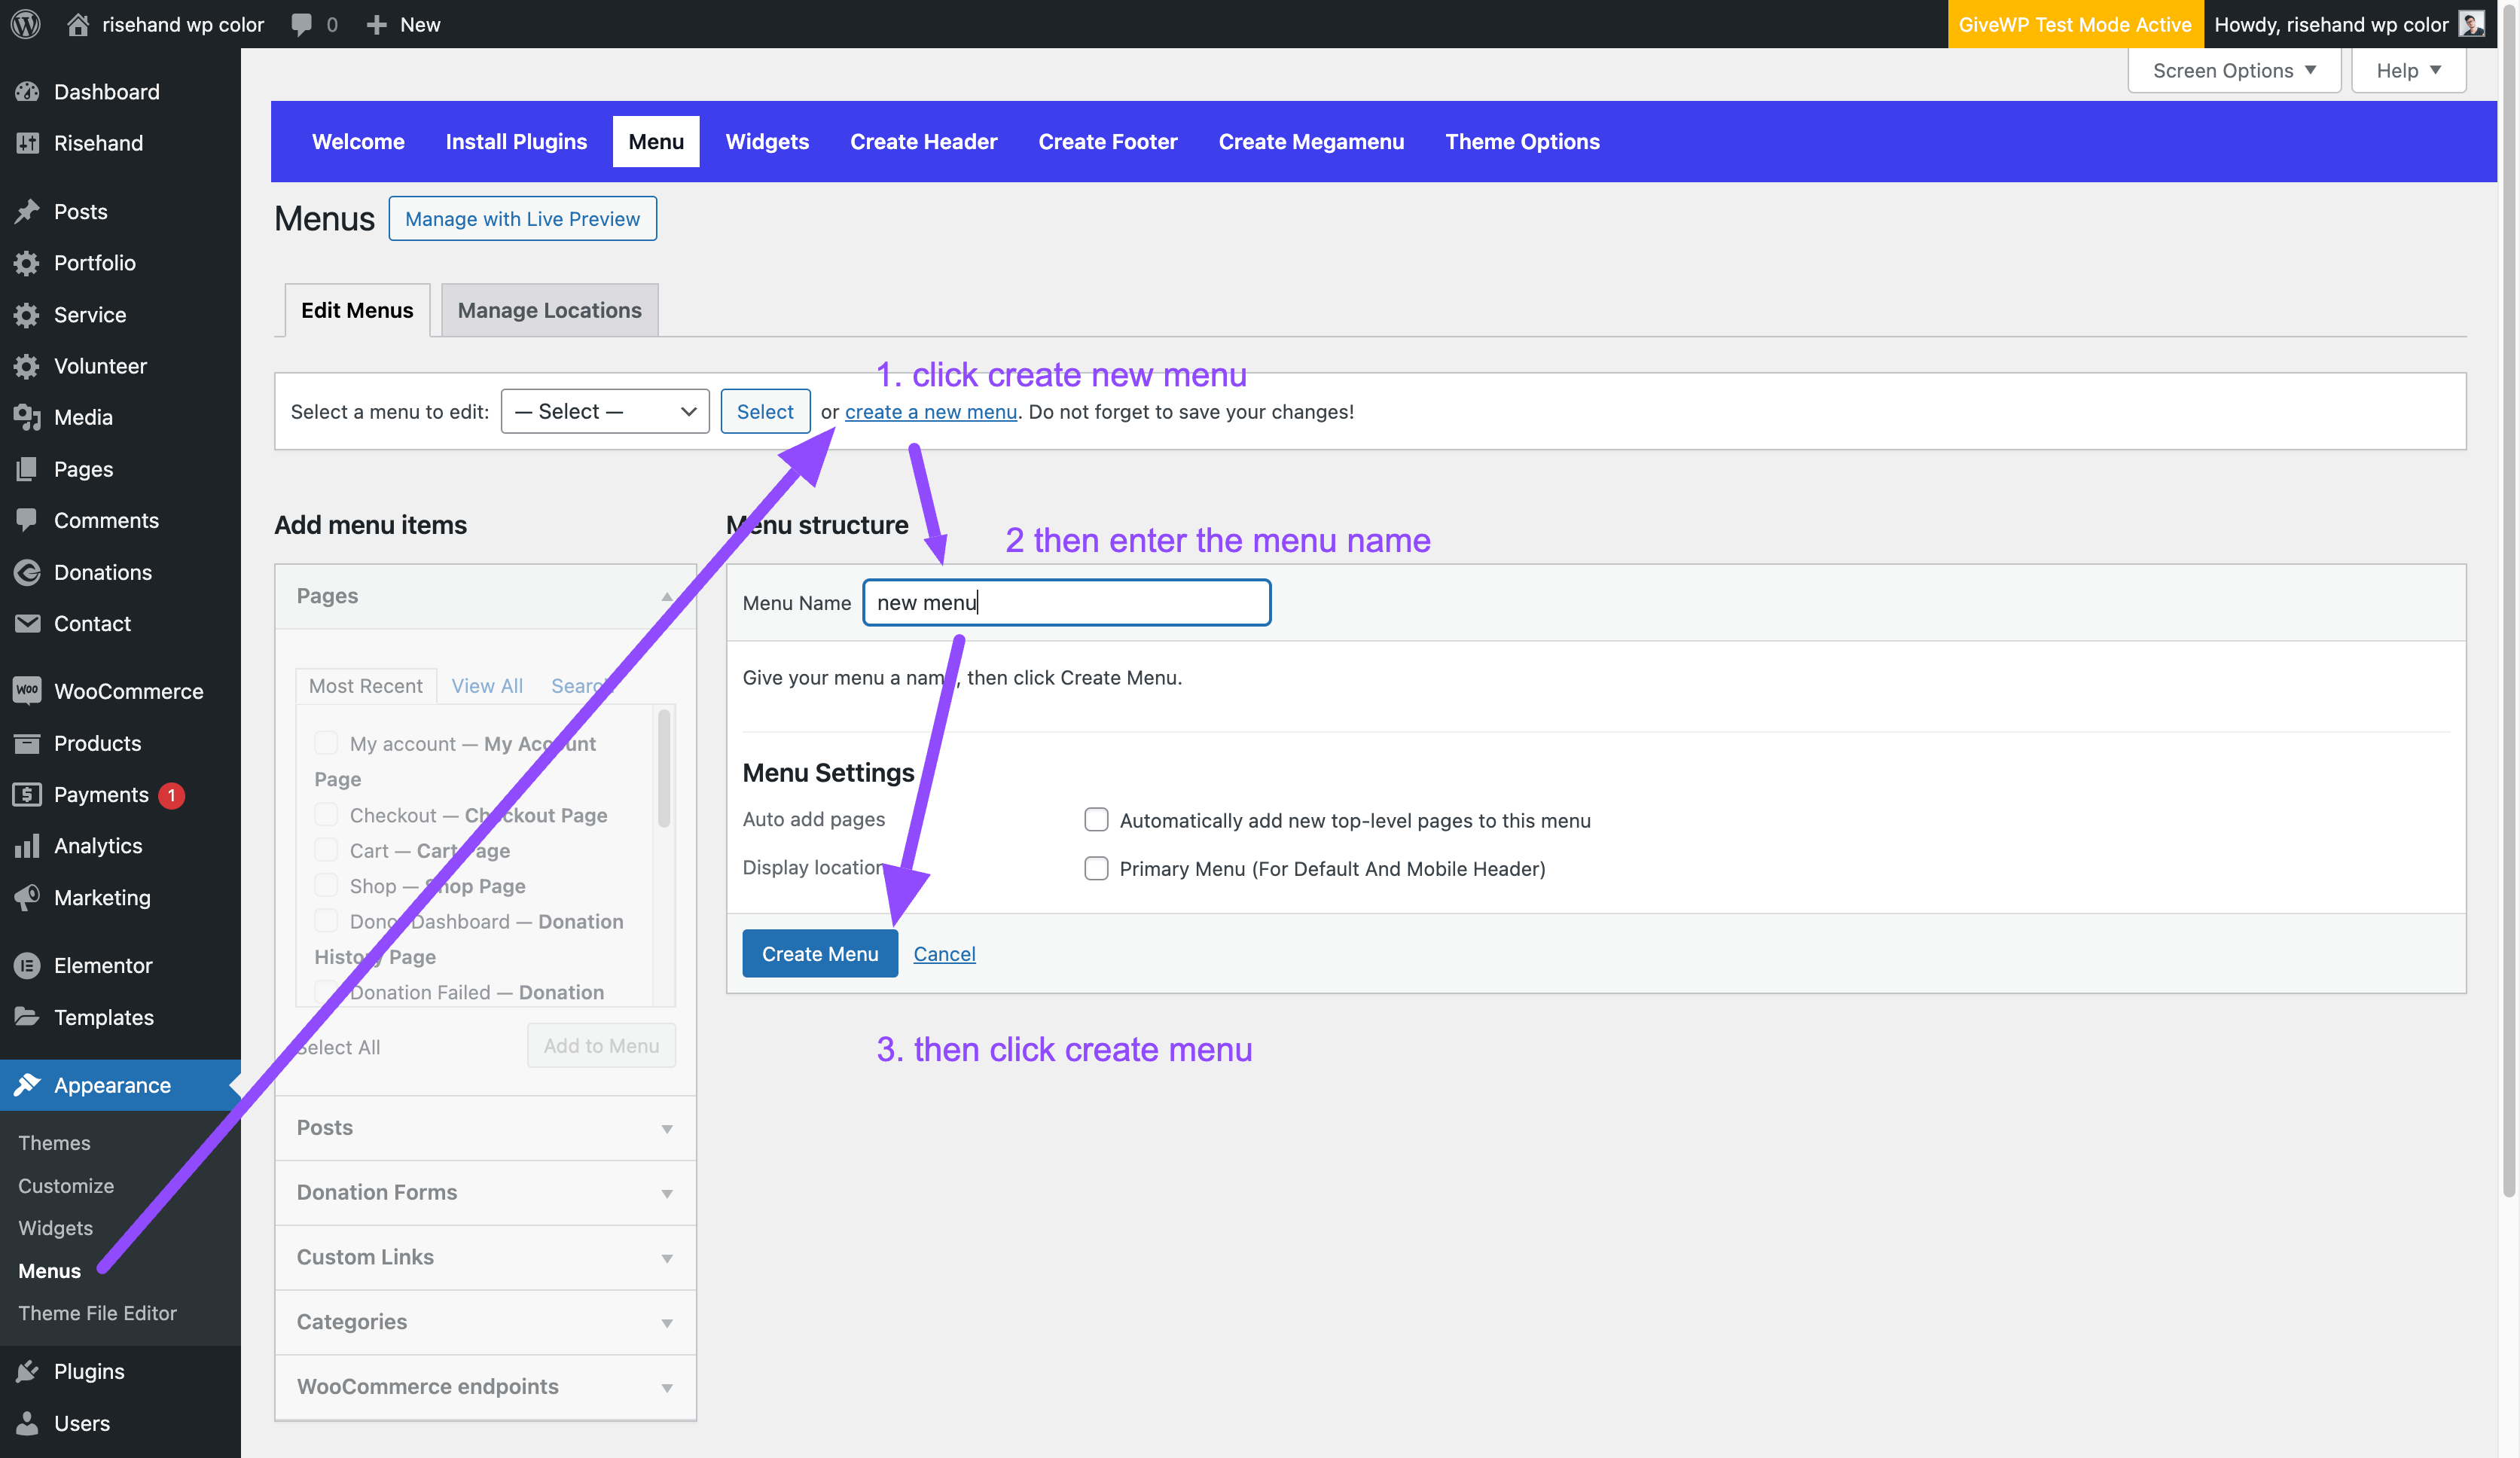
Go to 'Appearance' menu on the left-hand side of the Dashboard, select the 'Menus' option to bring up the Menu Editor.
Select Create a new menu at the top of the page
Enter a name for your new menu in the Menu Name box
Click the Create Menu button.
Your new custom menu has now been defined.
# Adding Items to a Menu
Your custom menu has now been saved.
# Find more option on menu area
# Too edit Header after importing and display by using theme option for entire site and change header for particular pages ?
On your Wordpress Dashboard ==> go to Luxride ==> Header ==>
Edit Header post with elementor
It will take to elementor editor area there you can change the content and
menu
To select header for entire site go to Luxride -> Theme option -> Header and Footer Settings -> Header Options -> Header Custom Enable / Disable -> Select Header Style
# Too Edit footer After Importing ?
On your Wordpress Dashboard ==> go to Luxride ==> Footer ==>
Edit footer post with elementor
It will take to elementor editor area there you can change the content there
To select footer for entire site go to Luxride -> Theme option -> Header and Footer Settings -> Footer Options -> Footer Custom Enable / Disable -> Select Footer Style
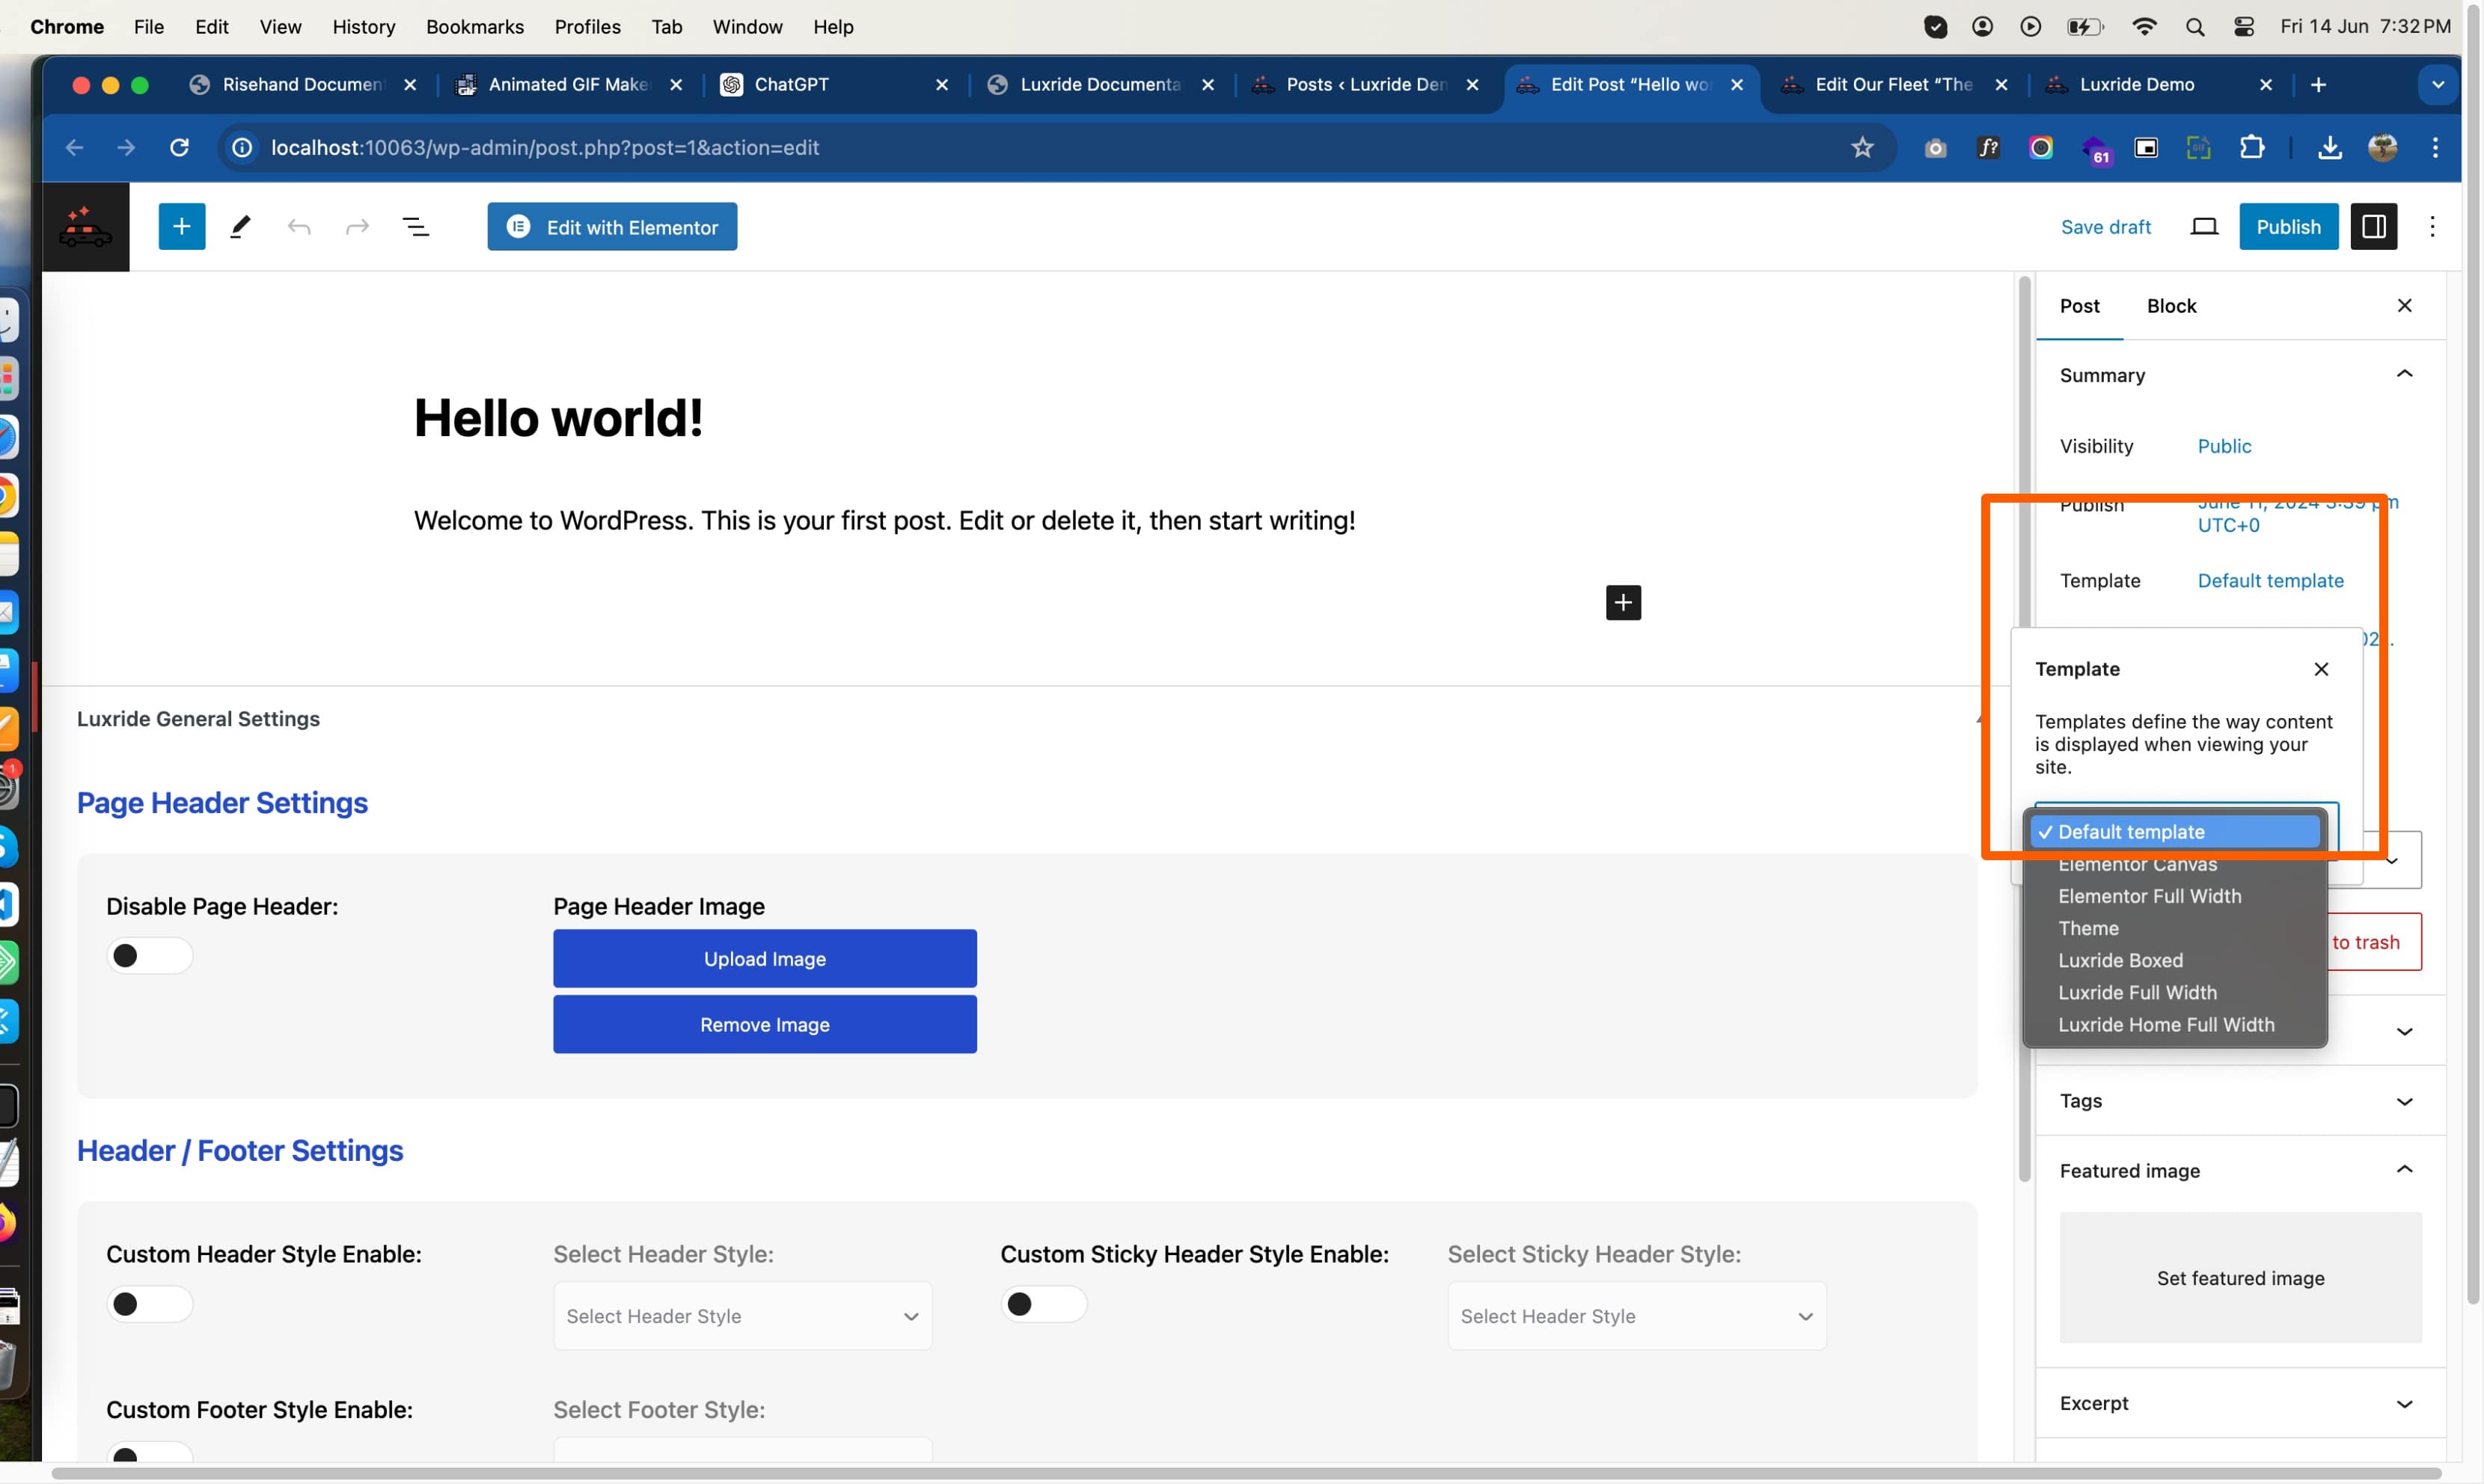
# To Know about tempalte usage for Page , Post , Ourfleet , Team and Service
There four types of template for post , page , service , team and ourfleet.
Default Tempalte ( That Comes With Sidebars )
Luxride Boxed ( That Comes With Page title Breatcrumb and 60px padding on body area and background light color)
Luxride Fullwidth ( That Comes With Page title Breatcrumb)
Luxride Home Fullwidth ( No page title and breadcrumb empty page. )
# To add or change the content on sidebars ?
On your Wordpress Dashboard ==> go to Apperance ==> Widgets
There you can find Blog Sidebar , Page Sidebar , Ourfleet Sidebar , Team Sidebar and Service Sidebar. Change the content
To display sidebars on Blog , Page , Fleet , Service and team. You need to change the layouts.Go to Luxride -> Theme option -> Layout settings -> Change the layouts.
You need to set the template to default tempalte for all service , page , post , overfleet and team to display sidebars.
# Contact form 7 html code
For Inuput , select , tel , number , check box and radio
# To change Page title background and to Hide / Enable
On Your Dashboard go to Luxride ==> Theme Option ==>
Luxride Page Header Settings
# To Set default archive pages for team , services and ourfleet.
All the post of service , team and ourfleet will display on selected archive pages.
To set archive pages for fleet post
On Your Dashboard go to Luxride ==> Theme Option ==> Luxride Fleet Settings ==> Select Archive Page Settings
To set archive pages for Team post
On Your Dashboard go to Luxride ==> Theme Option ==> Luxride Team Settings ==> Select Archive Page Settings
To set archive pages for Service post
On Your Dashboard go to Luxride ==> Theme Option ==> Luxride Service Settings ==> Select Archive Page Settings
# To Rename slug and category slug and post name for service , team and ourfleet.
By following this video you can rename slug and post name to any name you want.
To Rename slug , post tite and category =>
On Your Dashboard go to Luxride ==> Theme Option ==> Luxride Cutom Post Type Settings
# To Add service post and set service default archive page.
# To change service settings for service archive page and single page.
On Your Dashboard go to Luxride ==> Theme Option ==> Luxride Service Settings ==> Archive Page Settings
On Your Dashboard go to Luxride ==> Theme Option ==> Luxride Service Settings ==> Single Page Settings
# To Add team post and set team default archive page.
# To change team settings for team archive page and single page.
On Your Dashboard go to Luxride ==> Theme Option ==> Luxride Team Settings ==> Archive Page Settings
On Your Dashboard go to Luxride ==> Theme Option ==> Luxride Team Settings ==> Single Page Settings
# To Add fleet post and set fleet default archive page.
# To change Our Fleet settings for Fleet archive page and single page.
On Your Dashboard go to Luxride ==> Theme Option ==> Luxride Fleet Settings ==> Archive Page Settings
On Your Dashboard go to Luxride ==> Theme Option ==> Luxride Fleet Settings ==> Single Page Settings
# To Add blog post
# To change blog settings for archive page and single page.
On Your Dashboard go to Luxride ==> Theme Option ==> Luxride Blog Settings ==> Archive Page Settings
On Your Dashboard go to Luxride ==> Theme Option ==> Luxride Blog Settings ==> Single Page Settings
# 404 Settings
To change 404 image text and button link follow below video
On your Dashboard go to luxride => Theme options => Luxride 404 settings
# Performance Settings
Performance settings in theme will increase site speed little bit.
After complete your work enable this performance settings. If you are going to work the site again disable this option
On your Dashboard go to luxride => Theme options => Luxride Performance settings
If you are using animation in elementor. then disable the remove animation and elementor frontend editor option. Then only the animation and section will show.
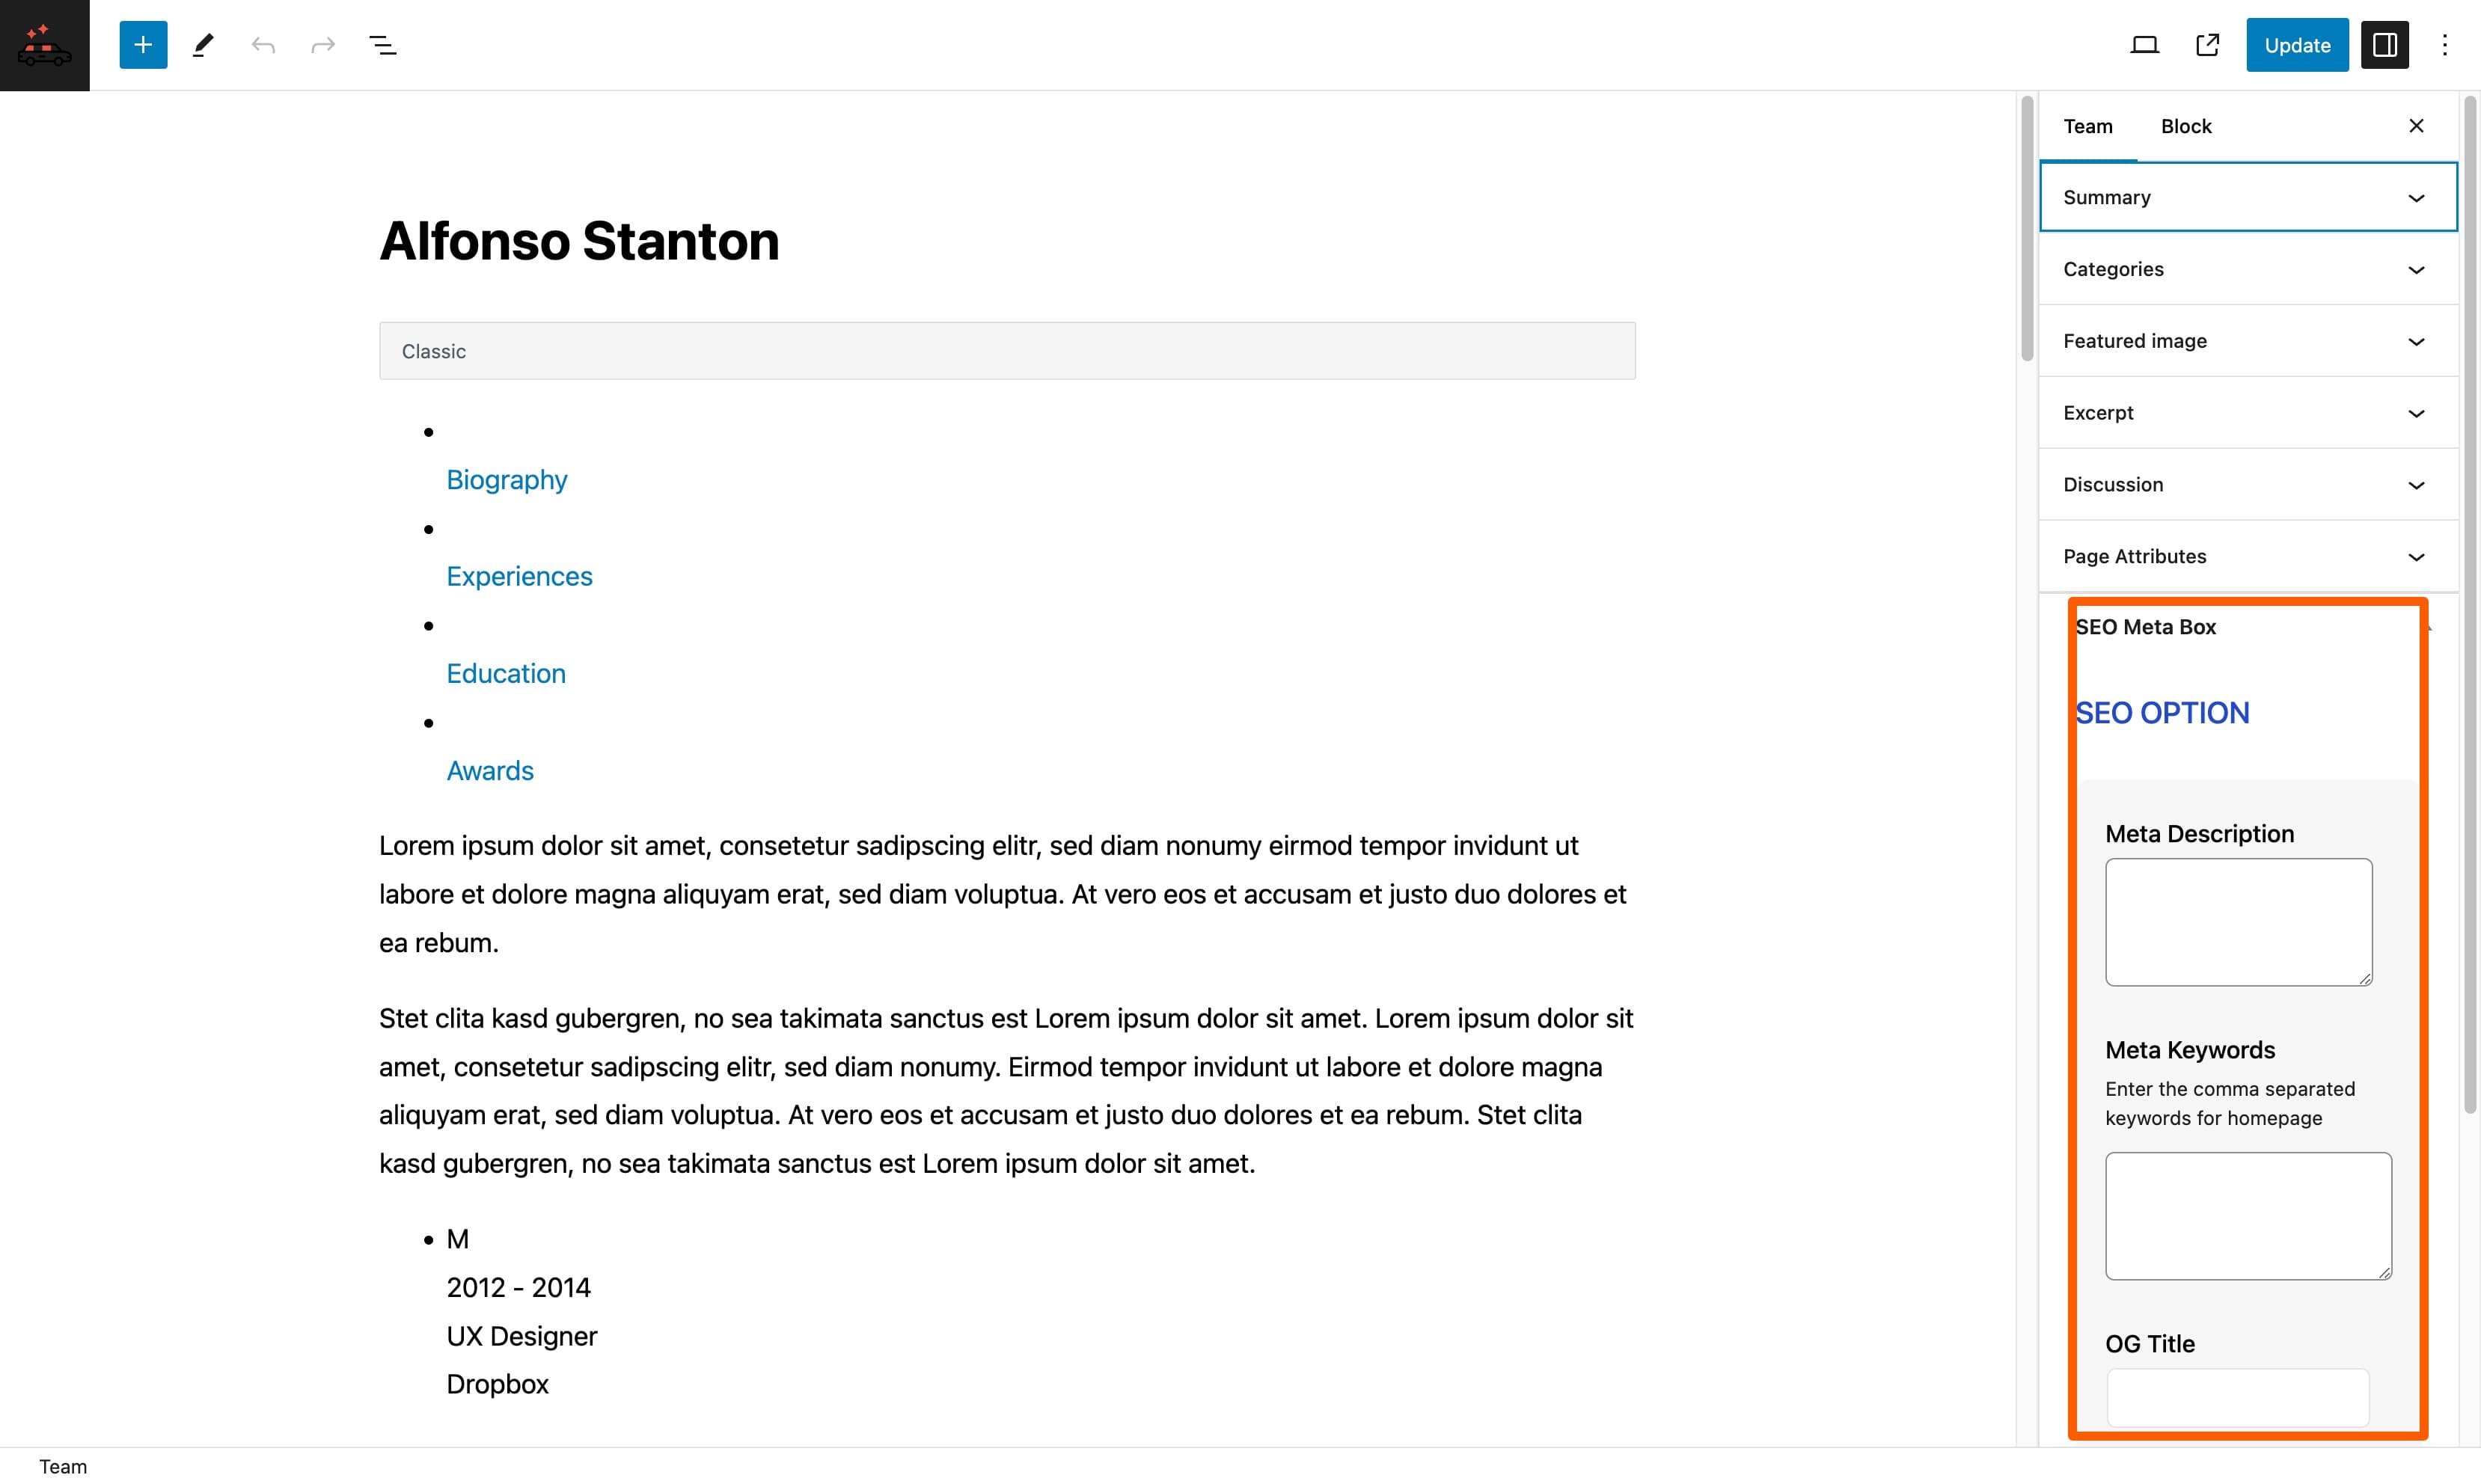
# Seo Settings
This is simple seo option. By using this option you can able to show meta image , meta title ,Meta Description , Meta Keywords for entire site and each page seperatly.
On your Dashboard go to luxride => Theme options => Luxride Seo settings
Edith each page , post , team , servic and fleet you will find seo option on side panel
# Theme Typography settings => Google Fonts and Custom Fonts
On your Dashboard go to luxride => Theme options => luxride Typography / Color Settings
First Click => Choose Custom Fonts / Google Fonts => select google font or custom font. Then Go back Google Fonts Tab Will show
Click Google Fonts Tabs => You will find typography option for body , h1 to h6 and p tag
If you choose custom font on => Choose Custom Fonts / Google Fonts tab => It will custom font tab
Click Custom Font Fonts Tabs => You will find typography option for body , h1 to h6 and p tag
# Theme Color settings
On your Dashboard go to luxride => Theme options => luxride Typography / Color Settings
To change Body Background Color , Image => Click the tab -> Body Background
To change Theme Color => Click the tab -> Theme Color
To change Menu Color => Click the tab -> Menu Color
# To Add Contact form 7 with icon
On your Dashboard go to contact form 7 => Add New
Copy the html code and add the form elements inside and change the icon